Announcement

Collapse
No announcement yet.

Build Log - Bread Dead Redemption (FW) - First Build.

Collapse
X
 
  • Filter
  • Time
  • Show
Clear All
new posts

  • #46
    Ah, I missed this in the speed read of the post from last night (thanks Jamie)...

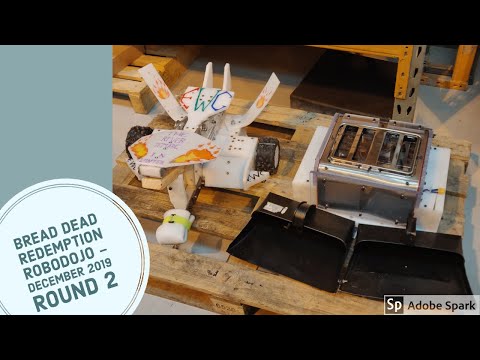
    I connected the wiring up to a drill battery and took it outside to see if it would run, which it sadly didn't. Seems to be a combination of the wheels slipping on the electrical tape holding them on to the drill shaft, bolts under the dustpans making it too front heavy and catching on the floor, plus the wheels still not having enough ground clearance even with the tyre.
    As noted, the tape will be chewed up pretty quickly. I would drill a hole through the bolt that your wheel is on and the hub of the wheel (I see you are using the same type of wheel as Azriel is) and then put a bolt through that to make it all secure. The bolts on the dustpan, countersunk bolts perhaps? Once those two are done, give it a retest and see what that does for you.

    Alternatively, for the wheel issue, where you have that washer on the outside of the wheel, get a bigger diameter washer, drill two holes in that and the wheel and bolt them together like that?

    Comment


    • #47
      Thanks all for your feedback and dustpan enthusiasm!

      On the ground clearance front, I've probably got 3-5mm from the base, although the screw heads probably need to be countersunk, so that probably takes away a mil or two. I've thankfully only got a few screws holding it together at the moment, so shouldn't be too bad to do that.

      I considered asking for the mounts to be adjusted when I ordered them from Nat, but trusted my measurements as I wanted minimal ground clearance. With the information from Sam about the Robodojo floor, I would have probably planned differently. I'll probably only cut the mounts down if I really have to, even if it is just a matter of pride at this point haha. (Thanks for the advice though, Nat. I'll definitely bear it in mind).

      I suppose the ‘simple’ option is bigger wheels, but then you need to know if they will fit in the room you have, is there any adjustments in the motor mounts?
      I've found some 120mm trolley wheels on Ebay, which should give me 10mm clearance. They are hopefully arriving this week. There isn't much room above, so I will have to either cut out a wheel arch in to the top HDPE panels on the bandsaw, or just make new top panels out of the 10mm Polycarb I have. Either one shouldn't be too much effort.

      Is this a temporary thing or not?
      I would say yes, because it was just a quick fix to get a rough drive test in before it went dark. At the same time though, I didn't have any better options, so also no .

      I would drill a hole through the bolt that your wheel is on and the hub of the wheel (I see you are using the same type of wheel as Azriel is) and then put a bolt through that to make it all secure.
      That makes a lot of sense! The bolt holding it in at the moment is the reverse thread bolt from the drill chuck, would that be secure enough to drill in to, or would you drill through the drill shaft it is screwed in to as well? I imagine the holding pin/bolt would have to be quite thin, so would it stand up to impact well?

      Alternatively, for the wheel issue, where you have that washer on the outside of the wheel, get a bigger diameter washer, drill two holes in that and the wheel and bolt them together like that?
      Definitely a possibility. I'll likely look at a combination of both, make sure it is extra secure. Cheers!

      The bolts on the dustpan, countersunk bolts perhaps? Once those two are done, give it a retest and see what that does for you.
      I think I know what the plan is for the dustpan already. The metal is relatively quite thin, so countersinking isn't an option. When I started, I was torn between either using nuts, bolts and washers to secure it or to put a small block of HDPE in the back wall of the pan before screwing through that with wood screws to spread the surface area. Wood screws would sit flatter than bolts, so I think that is the option I'm going to try next.

      Comment


      • #48
        gosh darn it, i was planning not to go but see this it would be wrong not to have a sportman hammer bot XD

        Comment


        • #49
          That makes a lot of sense! The bolt holding it in at the moment is the reverse thread bolt from the drill chuck, would that be secure enough to drill in to, or would you drill through the drill shaft it is screwed in to as well? I imagine the holding pin/bolt would have to be quite thin, so would it stand up to impact well?
          If you put a bolt/pin through the hub of the wheel and the drill motor shaft, you won't need the reverse thread screw, as the bolt/pin will prevent lateral movement and there's no risk of the wheel unscrewing, which are the main things the reverse thread screws are there for.

          If my memory serves, a drill shaft is 12mm diameter dropping down to ~10mm at the threaded part. If you can get away with an M4 bolt/pin, I would go for that (centrally drilled, that will leave 3mm material either side of the ~10mm portion or 4mm on the 12mm section) but an M3 bolt/pin would likey be okay.

          Comment


          • #50
            I imagine the holding pin/bolt would have to be quite thin, so would it stand up to impact well?
            Should be. I am going to be doing this on my Middleweight as the M6 grub screw has fallen out during fights a few times. Ironically, the M5 grub screw on the other side has not fallen out once, probably because it fits better in the keyed shaft of the motor. I would use nyloc nuts on the ends of the screws though.

            Comment


            • #51
              Wheels are now secure!

              I bit the bullet and bought a pillar drill from Screwfix, some 120mm trolley wheels and some 3/8th bolts from a Land Rover Defender. A quick blowtorch and heat press later, the wheels are on!


              It works, but seems to be pulling off to the right at low acceleration. I'm hoping that this is just the wheel catching on something and not something more serious. A thought in my head is that I've managed to lock the gearboxes in different gears, but I'm not sure if that's even possible.

              I've applied for Robodojo now, so pressure is on to get finished!

              Comment


              • #52
                Jibril does pull as well under low acceleration as well. Think Azriel does as well. I would try driving it on a piece of plywood or something to see what happens then. Uneven contact along the leading edge of the robot may also contribute to this.

                Comment


                • #53
                  If they're normal Argos drill motors the gearboxes are single speed, so no worries there! I've found going in a straight line at low speed a challenge too, I think basically what happens is that the motors are slightly mismatched (not sure if the drill motors have equal timing, if not that would be a guaranteed mismatch) so that when you're just putting a teeny bit of power on one motor starts running and the other doesn't. When you put a bit more power on the effect is much less pronounced.

                  Basically, if you're at say 25% throttle or so (let's assume the motors will start turning at abut 3V) they're on the cusp of starting, so a small difference between them is very pronounced if - again pulling numbers out of the air for illustrative purposes - one actually starts at 2.9V and the other at 3.2V. In that case one is turning and other is not moving at all, so you'd just go in circles.

                  To cut to the end... Same thing happened to me, I adjusted the trim on the Tx a bit and it seemed to be OK. I recommend tweaking the trim with the wheels off the ground so you can see when they start to move.

                  Comment


                  • #54
                    So the robot is pretty much done! I've got a few other minor bits to sort, but there won't be many changes from this between now and Robodojo.

                    LiPos, fuse and LEDs are wired in:

                    IMG_20191116_185838.jpg

                    Dustpans fitted on to the front:

                    IMG_20191118_152223.jpg


                    I've taken Sam's advice and adjusted the trim on the Tx and it drives much better (Thank you both Lucy and Sam for your comments on this, really put my mind at ease).


                    A few little bits still to do:

                    • Fit polycarb panels to front, back and sides of the toaster. This may change to mild steel, depending on how I get on. I quite a bit of weight still to use (currently 7.5kg).


                    • Add extra bike tyre to the new, larger wheels. Whether I have the space within the wheel guards to do so is a different matter.


                    • The dustpans have a fair bit of ground clearance due to being mounted straight on to the chassis, which kind of works against their purpose. I may get some hinges and attach them through those to scrape the ground more.


                    • Figure out armouring the top panel. I want to keep the slots because it needs to look like a toaster, but I'm also very wary of axes. I either put a polycarb panel across the top (which means no toast making in the arena ), or have the same size panel just above the mounts and have the top half of the toaster as "sacrificial space". Either way, this is the main route of doing maintenance on the robot, so needs to be kept easily accessible.
                    Attached Files

                    Comment


                    • #55
                      Looks marvellous! Looks... toasty in fact. Great job getting it up and running.

                      Could you fit a polycarb panel to the top with some (decorative) slices of "toast" sticking out? Just cut from foam or polystyrene would do it, or even something more solid since you've got weight to spare. That way you could have a bit more protection AND maintain your delicious toasty aesthetic.

                      (By the way, is anyone else expecting this to have the personality of Talkie Toaster from Red Dwarf?)

                      Comment


                      • #56
                        Looks very good, well done!

                        (By the way, is anyone else expecting this to have the personality of Talkie Toaster from Red Dwarf?)
                        Ah, but which version of Talkie are we talking about? Definitely looks like the Series 2 version, just needs a light on it :P

                        Comment


                        • #57
                          Given that the universe is infinite, and God is also infinite... Would you like a toasted teacake?

                          Talkie would be a brilliant personality for this machine, red paint and an led panel would make a passable “mk2” talkie like series VI.

                          Edit: Huge Red Dwarf fan, sorry
                          Last edited by Retroman; 18 November 2019, 23:40.

                          Comment


                          • #58
                            Great design-very much in the style of the early Robot Wars series where wedge shaped Robots

                            were frowned upon, well done, your Robot has personality, more like this please.

                            Comment


                            • #59
                              Event Report - Robodojo December 2019

                              The moment I had been waiting for had arrived. The debut of Bread Dead Redemption.

                              Saturday

                              In the days building up to Robodojo, I had been frantically cutting and bolting polycarbonate on to any exposed parts of the toaster that I could. I elected to put polycarbonate under the toast slices on the top at the expense of decorative toast, which with Midas and Pressure Point attending, I figured my decision was justified. Work continued well in to Saturday afternoon, until the point came to pile everything in to the car and set off for our hotel.

                              On arriving at the hotel, a few beers watching I'm a Celebrity, then Match of the Day, then bed.

                              Sunday

                              Early start on a freezing morning in Sherburn in Elmet. Roger and I gave a hand in setting up the arena, which certainly helped warm us up. I brought Bread Dead in and found a spot on the end of a bench including Mecha Sombra 2, BOB 3, Lunatic, Ensign Wedgeley Crusher, Blue Moon, Vettel's Vengeance, Crota and Toothless.


                              Tech check passed, that called for a sausage barm and a cup of tea.

                              Round 1 - Graffiti

                              First round of the event saw Bread Dead Redemption drawn against Graffiti, a robot usually in the full combat division. I wasn't too familiar with it going in to the event, but I was assured by other roboteers that it was going to be a baptism of fire. Having not driven the robot more than a few feet in the garage previously, I was so excited and nervous to get going.

                              IMG_20191201_105905.jpg


                              While arming up, the robot decided to go in to reverse on it's own accord. Not a great start, but it seemed to even out when I got to the corner. I got in to some good positions against Graffiti, but unfortunately didn't have the power to make any meaningful push. After the fight, the robot was still functional, just a bent dustpan.


                              Round 2 - Ensign Wedgeley Crusher

                              Round 2 matched Bread Dead against Ensign Wedgeley Crusher.
                              IMG_20191201_114032.jpg

                              This was a fight I was hoping for, as Sam has been incredibly helpful in this thread during the construction of the robot and it was great to finally meet the team in person. There was a bit of sizing up each other's robots down the bench before the fight, with the Wedgeley team unsure they could fit the toaster in their jaws. I was hoping to use that to my advantage.


                              That was a win! A great contest too. The lack of pushing power became apparent again, but I tried my best to keep the dustpans pointed at EWC and got a few pins against the wall. Absolutely buzzing.

                              Round 3 - Boring Wedge Bot


                              Round 3 against Boring Wedge Bot. I was informed that this was originally part of a cluster, so was only 5.5kg, a great fit for my dustpans and had one wheel covered in a shedload of duct tape to try and get some grip. Given the previous two rounds, I definitely wasn't confident of a victory, but surely I could push this one about a bit?


                              The fight began and I could push! Unfortunately, another problem soon became apparent. Despite the dustpans being low enough to get underneath BWB, the middle ridge where the two pans were joined was too high, meaning that BWB could easily get underneath if I attacked head on. I altered my strategy, trying to attack from a slight angle to get a good scoop, but a wheel fell off in the final few seconds and BWB got the win via judges decision.

                              Round 4 - Lunatic

                              As soon as I saw the matchup for Round 4, I knew it was a near-impossible task to get a victory. Lunatic finished 2nd overall in the yearly sportsman rankings, so I was just hoping to survive for as long as I could.

                              IMG_20191201_144246.jpg


                              I survived for longer than I expected. Bread Dead took some really heavy hits in this fight, but stood up to them well. I'm really pleased with how resilient it has turned out. Despite getting battered, I had so much fun.

                              Round 5 - Danger UXB

                              Surprise announcement, there was to be another round! Danger UXB was running on one motor due to breakages, so I was hopeful. I also heard enthusiasm from some roboteers watching the fights who were keen to see how the two unusual designs fought. We had been shocked after Round 4 about how well the robot had stood up to damage, with nothing requiring major repairs except screwing a wheel back on. Famous last words......

                              All I had to do was get to the arena.


                              Disaster. Driving to the corner, I hit a seam in the floor panels that dislodged a small servo cable from the receiver out of the speed controller. The lights were on, but nobody was home, and I was DQ'ed.

                              Gutted to finish a fantastic day that way, but it is what it is. After fixing the problem, I offered a whiteboard fight to Colin who was driving Danger UXB, which he accepted, but there sadly wasn't enough time in the schedule. I'll get you next time, Colin!


                              Conclusions

                              What a fantastic weekend! I loved every single second of it and had a big, stupid grin on my face pretty much all day. Actual dream come true. Thank you to Ian, Alex and Keith for organising the event. Also thank you to everyone who gave compliments and feedback about the toaster and made us feel so welcome. I'll see you all at the next one.

                              Improvements

                              With regards to improvements, it is obvious that the following issues need improving:

                              • Lack of power


                              • Lack of traction


                              • Difficult to control


                              • Better dustpans


                              I'm quite time restricted between now and Jan 26th for the next Robodojo, so I will have to prioritise. These are the solutions in my head so far:

                              • Upgrade from a 3s lipo to a 4s, overvolting the motors. More power.


                              • Ditch the plan of adding an axe and put the spare weight allowance to making the robot 4WD. I'm not sure how to do this with the Dual Sabertooth ESC. Would it be possible to wire two motors together on each side and wire them in to the ESC that way, or would that blow the board? Either that or rig up some drive pods with gears so one motor drives two wheels. I'm not sure yet.


                              • I would like tank-style steering. It's what I'm used to and just using one stick was proving difficult at times. Again, whether this is possible with a dual ESC, I don't know.


                              • Custom made dustpan (will have to happen eventually), or reinforce the current ones. I'm contemplating a Sawblaze style 3-prong pan, but I'm not sure that is needed for now. I'll have a think. The pans held up reasonably, but they may need replacing and modifying if I keep them as is.

                              Comment


                              • #60
                                First off, well done at your 1st event! I've faced all of those bots in some capacity before & going 1-3 against them for your 1st event isn't bad at all. Regarding your 4WD query, I definitely think 4 drill motors is the way to go in this case. Simply wire the motors in parallel & mount them & you should be good. Just make sure that the current rating for the Sabertooth is higher than the combined rating than the motors & you should be OK. It might be possible to have tank steering for a Sabertooth depending on your transmitter.

                                Comment

                                Working...
                                X