Announcement

Collapse
No announcement yet.

Go Ugly Early (FW)

Collapse
X
 
  • Filter
  • Time
  • Show
Clear All
new posts

  • Go Ugly Early (FW)

    Hi all.

    I've been following robot fighting ever since the first original series of RW, and it was a major reason why I went into Engineering in the first place.

    12 years later, and I've finally gotten round to my first bot "Go Ugly Early". I'd been thinking about a 2WD electric front hinged flipper for a while, but recently the design has morphed into more of a boxy ram bot, with the ability to overturn anything which gets on top of it.

    robot_v8 closed.PNGrobot_v8_hidden.PNGRobot_v8 open.PNG

    In the image, the front wedge itself doesn't go all the way to the floor, but two hinged metal pieces will drag along the floor, giving some it a front edge.

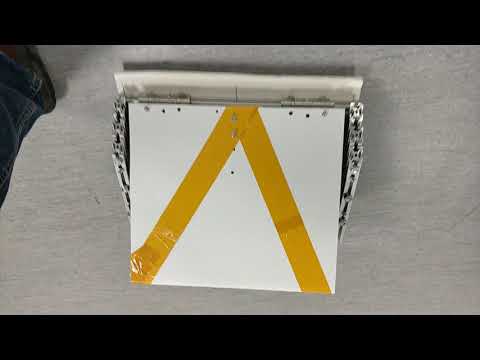
    The chassis is made from a series of 20mm stacked aluminium extrusions, held together by a series of vertical bolts (not shown). The armour is a triangular strip of Arris rail pine (made for fence posts). As long as I've secured it properly, this fairly soft wood, this should absorb the impacts, and can be changed after every fight. Looking at other build diaries, I haven't seen many with this combination of materials, perhaps there's a good reason for that.

    The model doesn't yet feature a few things, such as the battery, feathertwo and a series of rubber dampers to absorb some more impacts; but I've got several kg left in the allowance.

    My key parts:
    TX: Turnigy 9x (So far I'm happy, cheap, lots of channels, and mixing should I need it)
    Feathertwo dual
    Two Argos drills (mounts made by Roboteernat)
    750N, 50mm Linear Actuator
    4" 'stealth' wheels
    For now just the original Argos battery, but this will be swapped out at a later date.

    So far I have been focusing on getting the frame and mechanism just right. For the flipping/self righting mechanism, I found a program called Mechanical Expressions to be particularly useful, building a 2D structure, and applying the load of another robot on top.


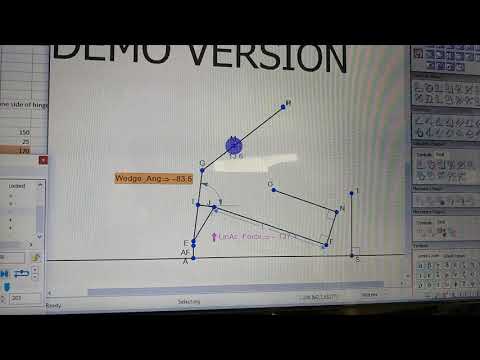
    The video shows a cross section of the robot, cut through the LinAc. The video shows that I can transition the top panel from 45 to over 100 degrees, all with the weight of another robot on top; while staying inside the LA's force limit of 750N.

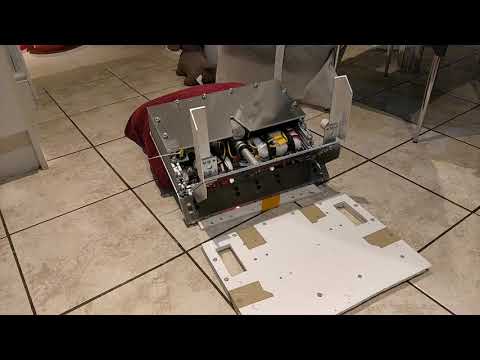
    I have also created the basic circuitry, and placed it in a testing chassis made from an off-cut plastic window ledge out of a skip.

    I've started ordering a lot of the hardware now, so exciting times. Any thoughts and suggestions welcome.
    Attached Files

  • #2
    err i might be missing something here but how are you gonna get under opponents ?

    Comment


    • #3
      Don't worry, I haven't settled on the exact shape yet (hence not on the model).
      I'm thinking about having a second set of hinges on the front rail, and each will have a metal wedge attached which drags on the floor. Think, a lazy version of Panic Attack's forks.

      Comment


      • #4
        Pine... I've used Pine before as a chassis for The Honey Badger 2.0. I got flipped out of the arena in Stevenage 2017 and the top one cracked completely. Changed to using Oak stair bannisters and that held up better until very recently.

        Comment


        • #5
          Update 2

          Been able to get some more time on the CAD (ProEngineer), and mocked up how the front wedge might work.

          Ugly CS.pngUgly Front.png

          To get under opponents, I'm thinking a strip of 4mm hardox which drags along the floor, hinged on the front beam. My only concern here is that any impact on the hardox will be transferred to the fire door hinge holding it, so I'm looking at a way of adding a damper to absorb some energy.
          Just behind that beam is a second set of hinges which allow the movement of the LinAc operated wedge panel. I did look at using a single set of hinges, but in this configuration, if one set is damaged the other can still function.

          I've also added my Feathertwo and batteries to the model, and while I still need to add a few bits and bobs, such as 14AWG wire, a few dampers, and a fair number of bolts; the total weight is only 10.6kg; so plenty of scope to thicken the materials.

          Ugly Isometric.pngUgly Top.png

          I tried to have a single battery, but it's just too long to fit, so I might need to go for two. While slightly heavier, it will improve weight distribution, and give some redundancy.
          One question I do have, do I go for 2x 4C 1300mAh in parallel, or 2x 2C 2600mAh in wired in series?
          At the start of a fight both arrangements would give the same result. But should one battery fail, the parallel arrangement means the machine can still function, just for not as long. While having this redundancy is nice, do I risk draining the working battery? And if so, would two series batteries be the way to go?

          Finally, I was looking at a ball caster for each of the front corners, but wondered whether I could use a dome head bolt (or nut) to slide along the arena?

          Comment


          • #6
            Originally posted by Wkdintent View Post
            Update 2
            Finally, I was looking at a ball caster for each of the front corners, but wondered whether I could use a dome head bolt (or nut) to slide along the arena?
            you don't need the bolt

            Comment


            • #7
              Do you mean I let the HDPE base scrape on the floor, or that I could just attach something (like a dome nut) to the underside without a bolt?

              If you mean the latter, I would probably stick with a bolt, as it's one of many attaching the base to the chassis anyway.

              Comment


              • #8
                I've used ball castors before and they do help with manoeuvrability but a dome headed nut will do fine as well. Just keep an eye out for wear and tear.

                Comment


                • #9
                  Ok cheers. Ocracoke, You've got a pair of batteries haven't you. How do you find them, and are they parallel?

                  Comment


                  • #10
                    No, they are in series, which, as you rightly point out, is a bit more risky than parallel because if the connecting wires break, that is it. The drain on the batteries will be equal though so you need to ensure that both batteries are fully charged as well otherwise you end up with one battery dying first, taking the other with it.

                    I use 2x 2S 2100mAh 2S1P LiFePO4 batteries in The Honey Badger 3.0, making it 4S1P but can go to 6S quite safely. The upshot of a series connection is more voltage so it is a easy way to get to 6S without needing a fairly weighty battery but the capacity remains 2100mAh so they do need charging after one or two fights. I keep a spare matching set around so I can simply swap out for the other set and charge the first set in the meantime.

                    Comment


                    • #11
                      Originally posted by Wkdintent View Post
                      Do you mean I let the HDPE base scrape on the floor, or that I could just attach something (like a dome nut) to the underside without a bolt?

                      If you mean the latter, I would probably stick with a bolt, as it's one of many attaching the base to the chassis anyway.
                      even if you don't counter sink the holes you don't need to use a bolt to act a caster, HDPE is slippy enough plus if you look at all other modern flippers they just run with the wedge planing the the floor. as look if you plenty of ground clearance everywhere else you should be able to drive around fine.

                      Comment


                      • #12
                        Ah really, that's interesting. I read lots of comments about the uneven floors, I thought it best to keep the chassis off it.

                        In that case it's mighty tempting to put a strip of 10mm hardox along the front. Hmm

                        Comment


                        • #13
                          Originally posted by Wkdintent View Post
                          Ah really, that's interesting. I read lots of comments about the uneven floors, I thought it best to keep the chassis off it.

                          In that case it's mighty tempting to put a strip of 10mm hardox along the front. Hmm
                          That is very true the floor is like a mountain range in places vut most people just power straight over, wheelie over, gyro over or find a smoother part

                          Comment


                          • #14
                            Update 3

                            It’s been quite a while since I wrote one of these, but work has continued over the summer.

                            Firstly, I was trying to put the front wedge on a hinge to drag on the floor, but even with fire-door grade hinges, I couldn't see a way to really make it robust. So, this has been replaced by a traditional flat 6mm Hardox plate (2), which was plasma cut by Lakeland steel for £55. (Their site has an automated quote system which I found very useful). This wedge is supported by four angled struts which bolt directly into the front of the chassis, and should take some punishment. I have even designed it so that the wedge can be reversed after a battle to give a fresh sharp edge. It might be 1.3kg, but I reckon it'll be worth it.

                            robot.png

                            The upper ramp (3) is no longer attached to the top lid, but actuates with two beams that go over the lid allowing the bot too self right.

                            On the aluminium strut sides (1) I was hoping to use (extremely cheap) triangular wooden armour, but it turns out the sizes on the website were measured in a strange way. So unless I can find a replacement, I might have to resort to flat HDPE panels, which bolt on the outside of the chassis (not shown).

                            Internally I don't seem to have given myself quite enough room for everything. While the main components are ok, it's little things which I'm having the cram into small gaps.
                            The servo controlling linear actuator is mounted on a bracket on the side wall of the chassis.

                            Using an oversized prototype lid and base I was able to get the thing moving, only to crash it into one of my colleagues steel toe cap boots, but luckily no serious damage. Even the FrSky Rx is now giving me the correct failsafe shutdown.


                            Finally, I am hoping to debut the machine at the Cheltenham event in November. Especially as I only live 10 minutes from the venue.

                            Comment


                            • #15
                              Update 4 - Cheltenham

                              Two weeks ago, I thought I only had a few minor things left to do, and I'd be good to go.
                              Fast forward to the evening of the final Friday, and I'm still not quite there. Even though the self-righting is now working, I still need to attach the HDPE armour, which I can do on Saturday.

                              IMG_20181108_220245.jpg


                              I arrive early and get set up, lots of people being very friendly and chatty. There's even a lot of interest in my use of aluminium extruded bars to build the chassis.

                              I'm all cued up for the FW melee, nervous and excited. I try and drive into the arena and, no movement... Turns out my newly added armour is so close to the floor, that once the bot is on it's wheels, they compress enough to remove all of the clearance. Balls.

                              Removing a 4mm spacer between the wheel mounts and the base plate, I'm good to go, again.

                              Show 2 and this time, not only do I get into the arena, but survive long enough to notice that I'm a) a rubbish driver, and b) struggling to do anything but a series of pirouettes.

                              Afterwards, I find that the reason for the latter was that one of my 4" 'stealth wheels' has cracked around the hub, and the other hanging on by a thread. A trip to Toolstation later and I have a set of trolley wheels which will be replacements.

                              Sunday morning arrives and after help from David; Paul of Team Solar Flare, and RoboteerNat, Go Ugly Early is ready to roll again, for about a minute...
                              As very shortly after the start of the next battle, I see a little puff of smoke, and the return of the bloody pirouettes.

                              A burnt out motor which should have ended my weekend, but a borrowed 550 (again from Nat) allowed me into the last fight of the weekend.

                              And it seems I was forth time lucky, as finally nothing went wrong! I still can't drive very well, but at least I knocked a few bots over. I was having a great time, until the house robot decided to carve it's way through the arena, knocking four of us into the pit.

                              Overall an awesome weekend with great people; and after I've earnt back some brownie points with the missus, I'll be back with version 1.1.

                              IMG_20181111_164354.jpg20181111_174201__01.jpg
                              Attached Files

                              Comment

                              Working...
                              X