 Tweet
Tweet
As far as I know, the signups for Manchester (or indeed, any other Extreme Robots event) hasn't been released yet. Looking good though, you'll want to have some break in time with it to free up the mechanism as you mentioned.
-
-
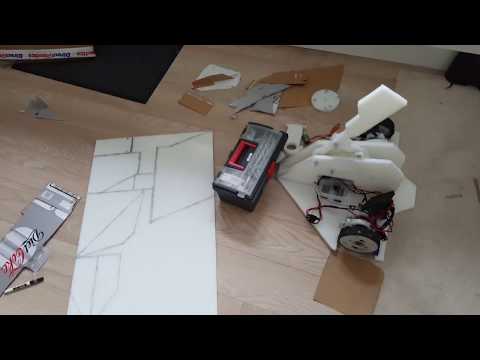
Well I spent all night yesterday wiring up the weapon motor, rewiring the lights and spent all day today with a friend to work on the weapon arm (which pretty much makes it a club right now) and the links that connect the arm to the L linkages.
Both sets of batteries are on storage charge, ready to be charged tomorrow for a test run, the battery box is going to be replaced for the third time, as I managed to make the battery hole larger once again, and I'll just have to go from there, make a check list of things.
If it all works out, I can move on to making a spike for the weapon out of a piece of rolled steel tubing... might not work, but it's worth a shot, make a skidplate so the HDPE doesn't end up wearing out as if it was running on sandpaper constantly, and then mock up some templates for the armour out of some cardboard I have lying around the place.
All goes well, it'll be done by the end of Monday next week. If not, well... maybe Friday next week. Who knows.Comment
-
So, after that rather unfortunate hiccup with the weapon motor burnt out, I have the new scooter motor for the axe, and I've been modifying the inner spines of the robot once more, as shown in this video;
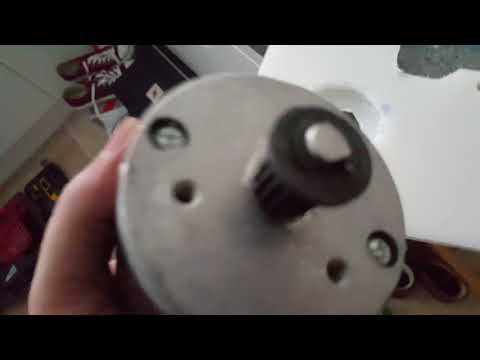
Unfortunately, although I know how to remove the circlip on the scooter motor, I have no idea how to pull the timing belt sprocket off so I can do whatever I want with it... Either I'm weak as all hell or I need some sort of tool to get it off the axle...
Any help?Comment
-
i just tried to make a video to post on getting this off, but just get a small flat head screw driver and place it in the gap of the 'e-clip' and twist it. that will remove it, then just pry up the pulley with a bigger flat head screw driver... video coming if i can
in fact this will do:
https://www.youtube.com/watch?v=UC4H3bDnmzg
not my videoLast edited by Roboteernat; 16 February 2018, 23:20.Comment
-
No no, I can remove the e-clip without any problem, it's taking the pulley sprocket off the axle itself, but it refuses to budge.Comment
-
not sure how effective the would be but if you have a blow torch try heating it up, if there is any glue it will break that and if you do it right expand the pulley, just be careful not to burn yourself. when I was young kid me and my dad were making a go kart and i grab the wrong end a of a axle he had welded, yeahh that hurt.Comment
-
Unfortunately, I don't have access to a blowtorch, so that method's out of the question.
I mean, if I can't get it off, I'll just do the grip technique like I did with the mounts for the motor and glue it around the pulley.Comment
-
i see not the eclip.
You could use a lighter to heat up the pully to break the glue - it will break down with heat. then, with some needle nose pliers, place the pliers under the pulley and around the shaft and level it up, heat and lever, heat and lever etc. it will work it self up.Comment
-
So, another little update, considering I've been kind of behind on things here, I've managed to get the motor mount cut out, just need a couple of things to do with that, and that'd be good to go.
With that being said, I'm not entirely sure how long the armour cutting would take, along with the shaping and such, but if I get another nice, sunny day with no chance of rain, then I'm definitely going to be getting the jigsaw, drill and dremel out again and giving the plastic a good going over.
Other than that, soldering, cutting, and testing, and Ratatoskr may end up getting into Manchester!Comment
-
Oh lordy lew, it's been a while since I've updated the build diary. But I made a small amount of progress since the disappointment of not making it to Manchester last year due to it not being safe in my eyes. The front plates were bowing, there wasn't enough time to add a weapon locking mechanism and it just didn't look safe. So after the bullsh*t that was the weather of last year, I've finally managed to get out, into the shed and back on Ratatoskr... which their dowel nuts have rusted up a little... though it is superficial, I'll just give it a sanding if need be.
Anyway, the little update, I've managed to add a couple more spines on the front of the robot, angled so that I can rest the front plates on them and make it a little smoother. So there'll be two plates for each side, each spine will hold both plates, and make sure that everything's a little smoother than before... maybe I should draw something up to be a little bit more clear with it haha.Comment
-
Well, finally managed to get an update video sorted out...
http://[URL="https://www.youtube.com...[/URL]
Not sure if that code'll work, but if it does, hey something worked.
So a simple update really, and if I sound a little nervous, not only is it something I haven't done in a while, but I had to evict a wasp earlier. Hate the sods, haha.
So now, I'm looking for a battery box and an ESC box... I'll have to make measurements as soon as possible. Either way, hopefully later on this week, I'll be able to cut up more for the robot.Comment
-
Looks good!
Out of interest, why are you worried about the rust on the dowel nuts? It doesn't look pretty but it seems pretty superficial, I wouldn't have thought it would affect them structurally.Comment
-
The rust on the dowel nuts won't have any effect on their strength, they'll be absolutely fine to keep using. If you don't want them looking rusty, just pop them in a tub/glass/bowl, fill with Coke and leave for a couple of days. If you do want to buy more, I just get mine from Screwfix. They've been out in the shed for ages and show no signs of rusting.
In terms of battery and ESC boxes, do you have any spare plastic left over? It wouldn't take much to knock up a couple of enclosures out of offcuts, as well as fashioning a lid/restraint for them. Alternatively, just grab some plywood and wood screws from B&Q, will probably cost about the same as if you were to buy a commercial solution.Comment
Comment