Originally posted by Eidg
View Post
-
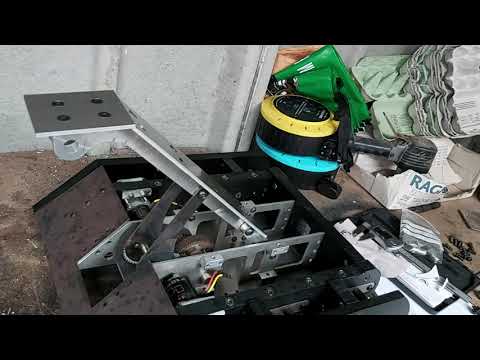
The Spur gears arrived for the weapon and after a quick mod by SC Robotics (thanks again Nat) they were ready to install in the weapon and after a quick dismantle and greasing of the weapon gearbox the weapon was ready and with the excitement of having that ready I charged up the lipo, installed the ESCs and boom a full system test was done.
20210924_130217.jpg 20211007_114254.jpg 20211007_162224.jpg 20211007_164632.jpg

All thats left to do really is get the new wheel hubs and the pulleys printed so we can see some 6wd action.Leave a comment:
-
Lots of fun with Aluminium recently, started the bulk of the threaded blocks to mount the weapon mech into the robot. The redesign means I can make the weapon mech removable for the possibility of interchange wedges and lifters.
20210906_154931.jpg 20210907_182853.jpg
The weapon arms arrived from Team SC Robotics on Friday.
20210909_121553.jpg
The last bits to do to the arms was tap the side holes. Then add the threaded holes to the top and front of the arms to attach the panels. I had a little mishap on the first arm I did where the holes were not exactly aligned correctly (note the one bolt missing in the top panel of the arm.) But thankfully this didn't affect the function of the weapon.
20210909_163531.jpg 20210909_163617.jpg
Then today I did the second arm this time using the same tactic I use on HDPE to get my hole markings aligned (printed template glued on the side) and within 2 hours the weapon was fully installed.
20210910_141156.jpg 20210910_164422.jpg
When I refined the weapon to fix my errors with the old version I made sure to have better tolerances where the old one didn't. Of course my refined tolerances was still a little tight but luckily the hardox front bars from EMSEA was 3mm instead of 4mm that I originally planned to use, due to a shortage of 4mm and that gave me the exact tolerance needed to have the arm move perfectly.
Here is a video of the four-bar in motion. The old version needed a lot of filing to even close under it's own weight.
The weapon is waiting on new spur gears to arrive for the middle stage reduction then I can install the motor and gearbox and should be able to get it running under it's own power. The drive still needs new front wheels and pulleys to get things functioning so fingers crossed by the end of October we could be having a moving robot.Leave a comment:
-
Might have it running in a month, need to have new pulleys printed and new front wheels to run on the gearboxes.Originally posted by Ocracoke View PostLeave a comment:
-
Very neat. Locking bar looks good and strong too. Reckon you'll have it moving around before too long?Leave a comment:
-
More progress made, the side panels have been made, which is scary as I had to drill at 10 degree angles with a hand drill. Thankfully I designed it right in CAD and I'm happy with the result. Quick test with the locking bar to make sure it fits.
20210827_105121.jpg 20210827_111108.jpg 20210827_124300.jpg 20210827_124322.jpg 20210827_125205.jpgLeave a comment:
-
Thanks Jamie, the forstner bit and a Stanley knife worked out better then I hoped.Originally posted by RogueTwoRobots View PostLeave a comment:
-
Looking good James, I like the simple but effective method you used to mill out the mounting points for the dead shafts
Leave a comment:
-
Post house move:
After moving Cumbria to live with my boyfriend work recommenced. The slot and tap approach to the weapon housing made the test assembly easier after fitting most of the old mechanism into the new robot. This time getting everything correct. With the bolts, nuts, etc arriving I could begin to bolt the robot together. Here you can see the Aluminium slots that help support the dead shaft attachment to the bulkheads.
20210808_162215.jpg 20210808_162222.jpg 20210816_160411.jpg 20210816_160418.jpg
I started making the side panel supports that also have slots to allow the drive belts to pass through.
With the threaded inserts attaching the dead shafts and lids was now fully possible.
20210818_142636.jpg 20210818_142745.jpg 20210820_115225.jpg 20210820_115229.jpg
The motors are ready to be mounted in place once the m5 nyloc nuts arrive. And with that you are up to date with the build the next step is make the side panels and refine their supports to get them to sitting right on the robot.
20210821_162621.jpgLeave a comment:
-
ONE YEAR LATER:
Whoops has been a while. Lots of progress has been made since my last post.
Starting off here is the up to date CAD of CSB 2.1, I revised the back so the back of the bulkheads are not sticking out so far. This has resulted in a Biteforce style back end. In the end I went with the brushless motor and BaneBots gearbox for the drive for simplicity of mounting it.
CSB_2.1_26.jpg
I've been ordering parts and materials since April and was slowly making the first parts of CSB 2.1
Starting of with the 20mm HDPE bulkheads. Progress was slow due to my time being dedicated to my Beetleweight CSB: Echo which was being readied for the Chatham Challenge Belt.
20210408_191026.jpg 20210412_131347.jpg 20210520_170018.jpg 20210527_162827.jpg
While working on the HDPE parts the Aluminium and Hardox panels arrived from EMSEA. I've opted to use Aluminium in place of hardox in select areas to keep the weight down. The 11:1 Banebots P61 gearboxes were modified so they could be face mounted with the Aluminium plates.
20210625_115841.jpg 20210625_115902.jpg 20210627_175739.jpg 20210627_175749.jpg
This was where I got up to before attending Chatham and moving in with my boyfriend a few weeks later.Leave a comment:
-
protects them more, if you have another neon style event you be able to keep driving tho without one set of wheelsLeave a comment:
-
It's doable, but why?Originally posted by Maxamuslead View PostLeave a comment:
Leave a comment: