 Tweet
Tweet
Hello!
Building an antweight was always on the agenda for me, but it was put on the backburner due to upgrading Bread Dead Redemption between events. I've found myself with a bit of time on my hands and a 3D printer, so it's time to start on my new antweight!
Introducing.... Crumbs!
I've titled the build log "(and Friends)" because most events allow multiple robots and I will probably attempt more ambitious antweight projects in the near future to improve my CAD skills, so any other robots will be lumped in here too.
Specs
So Crumbs consists of the following:
The Build
I played around with a few ideas for Crumbs, but my limited CAD skill let me down. I decided to do a test print of an antweight chassis downloaded from Thingiverse before I settled in to a designing session, just to see how everything worked and slotted together. Having a 3D model on your screen is one thing, but I learned a lot by just having a physical version to compare.
Once I had deleted a few attempts, I fired up Sketchup and decided to make a simple 100x100x20mm wedge.
Screenshot_20200411-214826.jpg
Quite a hefty wedge at the front, all sides angled to deflect spinners. Even managed to get some motor mounts and lid supports built in. I was very proud of myself!
IMG_20200411_233123.jpg
Test print number 1. Printed at 50% infill to allow the wedge to have enough structure, but also hopefully flex a bit under impact.
IMG_20200412_123750_676.jpg
Small banana for scale.
I experimented with a few different designs for wheels, but eventually settled on 24mm lego wheels. I found a hub adaptor for the N20 shaft to fit the lego tyres on Thingiverse. Works like a charm....
...downside is, it doesn't fit in the chassis. Back to Sketchup!
Due to the size limitation of UK antweights having to fit in to a 100mm-ish cube, I could go up to 142mm in any dimension, providing that I don't expand the other 2. Having a preference for wide wheelbase robots, I upped the width to 130mm and tried again.
Wide Crumbs CAD.JPG
IMG_20200418_113501.jpgIMG_20200418_113525.jpg
Perfect!
IMG_20200418_124207.jpg
Size comparison with the previous chassis.
Next was to design a lid. I wanted this to include a small block above the motor mounts to press the motors in place. The lid is 3mm, dropped in to the chassis as the posts I included in the chassis design are 17mm.
Crumbs CAD with Lid.JPG
Result! The lid just about fits, but with it being such a tight fit, I don't think it would stand up to impact too well if the chassis took a knock. Perhaps I should take it back 1mm or 2 in future revisions.
IMG_20200418_175129.jpgIMG_20200418_191853.jpg
And that's where we are at so far! I still need to add in a hole for the power switch and wire everything up, but at least everything fits in place. Currently weighs ~121g, so still some room left. It's a rough first draft but I have a functional antweight!
The final plan is to make it look like a mini toaster, so I can maintain my team branding. With the extra weight I may add some stainless steel to the front and top, as I have some left over from the holes I cut in Bread Dead. The final robot will also be printed in white PLA+, with toaster slots either drawn or designed in to the lid.
Building an antweight was always on the agenda for me, but it was put on the backburner due to upgrading Bread Dead Redemption between events. I've found myself with a bit of time on my hands and a 3D printer, so it's time to start on my new antweight!
Introducing.... Crumbs!
I've titled the build log "(and Friends)" because most events allow multiple robots and I will probably attempt more ambitious antweight projects in the near future to improve my CAD skills, so any other robots will be lumped in here too.
Specs
So Crumbs consists of the following:
- 3D printed chassis (ESun PLA+)
- 2x N20 motors
- 1.8A dual motor ESC from Ebay.
- Flysky FS-RX2A Pro micro receiver
- 2S LiPo
The Build
I played around with a few ideas for Crumbs, but my limited CAD skill let me down. I decided to do a test print of an antweight chassis downloaded from Thingiverse before I settled in to a designing session, just to see how everything worked and slotted together. Having a 3D model on your screen is one thing, but I learned a lot by just having a physical version to compare.
Once I had deleted a few attempts, I fired up Sketchup and decided to make a simple 100x100x20mm wedge.
Screenshot_20200411-214826.jpg
Quite a hefty wedge at the front, all sides angled to deflect spinners. Even managed to get some motor mounts and lid supports built in. I was very proud of myself!
IMG_20200411_233123.jpg
Test print number 1. Printed at 50% infill to allow the wedge to have enough structure, but also hopefully flex a bit under impact.
IMG_20200412_123750_676.jpg
Small banana for scale.
I experimented with a few different designs for wheels, but eventually settled on 24mm lego wheels. I found a hub adaptor for the N20 shaft to fit the lego tyres on Thingiverse. Works like a charm....
...downside is, it doesn't fit in the chassis. Back to Sketchup!
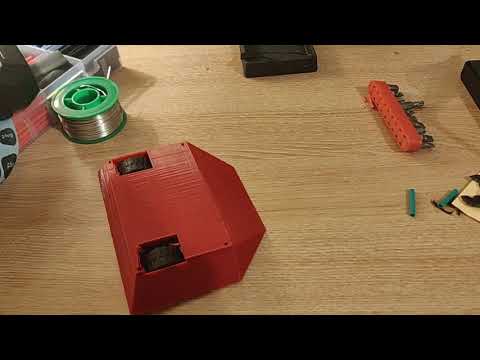
Due to the size limitation of UK antweights having to fit in to a 100mm-ish cube, I could go up to 142mm in any dimension, providing that I don't expand the other 2. Having a preference for wide wheelbase robots, I upped the width to 130mm and tried again.
Wide Crumbs CAD.JPG
IMG_20200418_113501.jpgIMG_20200418_113525.jpg
Perfect!
IMG_20200418_124207.jpg
Size comparison with the previous chassis.
Next was to design a lid. I wanted this to include a small block above the motor mounts to press the motors in place. The lid is 3mm, dropped in to the chassis as the posts I included in the chassis design are 17mm.
Crumbs CAD with Lid.JPG
Result! The lid just about fits, but with it being such a tight fit, I don't think it would stand up to impact too well if the chassis took a knock. Perhaps I should take it back 1mm or 2 in future revisions.
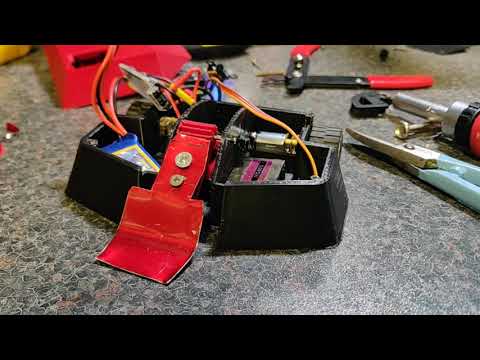
IMG_20200418_175129.jpgIMG_20200418_191853.jpg
And that's where we are at so far! I still need to add in a hole for the power switch and wire everything up, but at least everything fits in place. Currently weighs ~121g, so still some room left. It's a rough first draft but I have a functional antweight!
The final plan is to make it look like a mini toaster, so I can maintain my team branding. With the extra weight I may add some stainless steel to the front and top, as I have some left over from the holes I cut in Bread Dead. The final robot will also be printed in white PLA+, with toaster slots either drawn or designed in to the lid.
Comment